Devices are source from where logs are collected or fetched. A device is designated through its IP address or addresses. In order for Logpoint to accept incoming logs, it needs to know which devices are going to send log messages. For that reason, you must add and configure devices to start receiving logs. If a device isn’t added and configured, Logpoint will block traffic on its internal firewall. A device’s logs are retrieved by a collector or fetcher configured on the device itself or through a collection policy. A device can be part of a device group, a logical grouping of two or more similar devices, but it doesn’t have to be.
In the Devices list, Last Log Received shows the last time a device sent log(s). If a log is received within the set threshold time, its Last Log Received timestamp appears in green. If no log is received within that period, the device is considered inactive and the timestamp is shown in yellow. The default inactivity threshold is 60 minutes, but this can be edited when Adding a Device .
You can also create a query with “message”=”Inactive Logsource monitoring” to generate alerts, visualize data in dashboards, create reports, and perform searches for inactive log sources.

Devices
To view details of each device, click the Details ( ) icon under Actions.
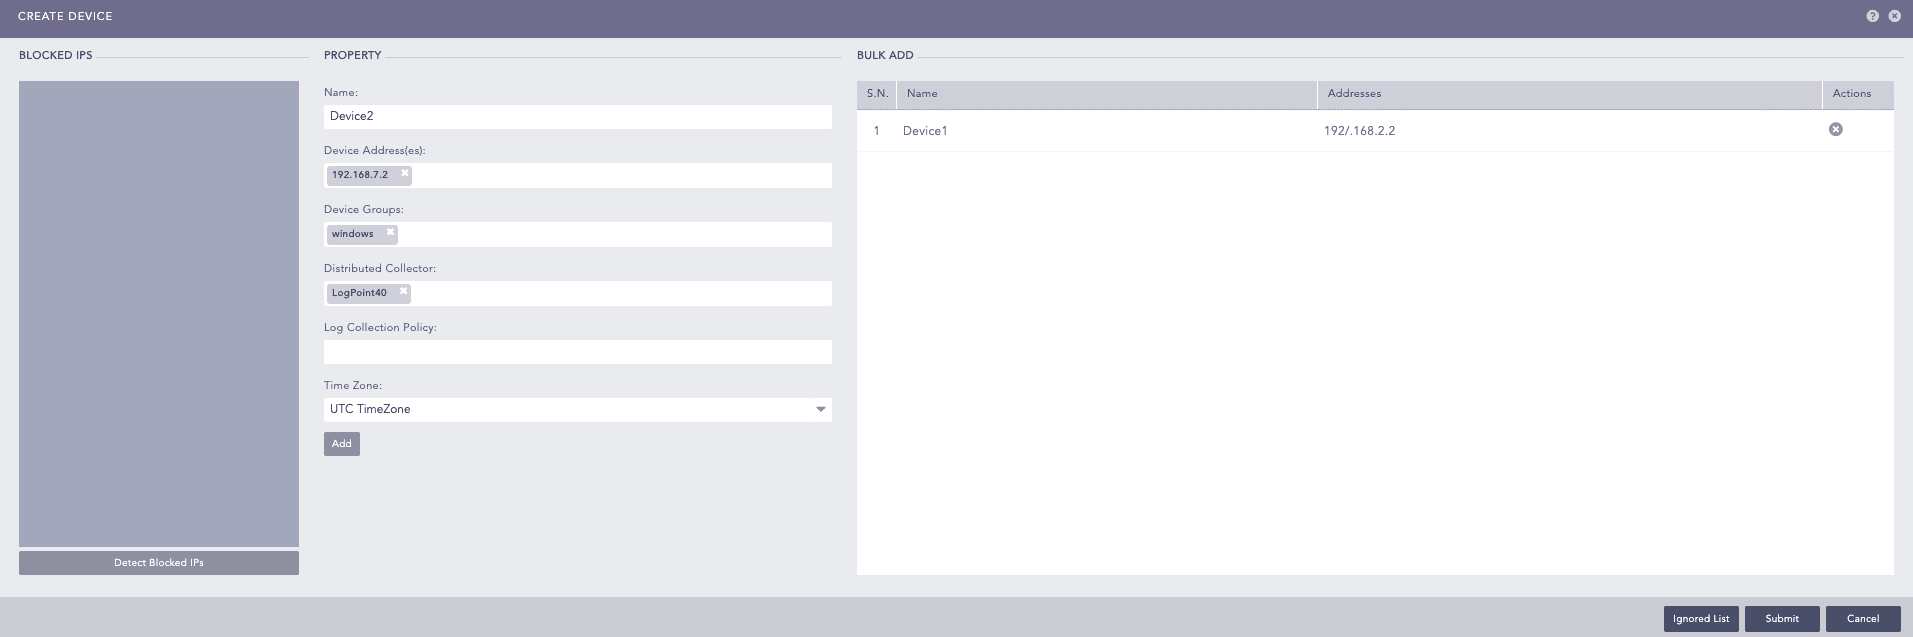
BLOCKED IPS lists upto 1000 blocked IP addresses from all the devices sending logs to Logpoint within the last hour. The IPs of Syslog logs are not listed if you have enabled Accept logs from Unregistered Log Sources in Syslog.
Go to Settings >> Configuration from the navigation bar and click Devices.
Click ADD BULK DEVICES.
Click Detect Blocked IPs for a list of the IPs blocked on the ports where there are configured collectors.
To add the blocked device, double-click the blocked IP. The device’s details are in PROPERTY, where you can enter or edit the device’s properties manually. Click Add and click Submit.
To ignore the blocked IP in the list, click the Ignore icon. To view a list of all the ignored devices, click Ignored List. Click the Remove ( ) icon under Actions to remove the devices from the list.
The devices configured here using Syslog Collector are not listed under Settings >> Log Sources.
Go to Settings >> Configuration from the navigation bar and click Devices.
Click ADD.
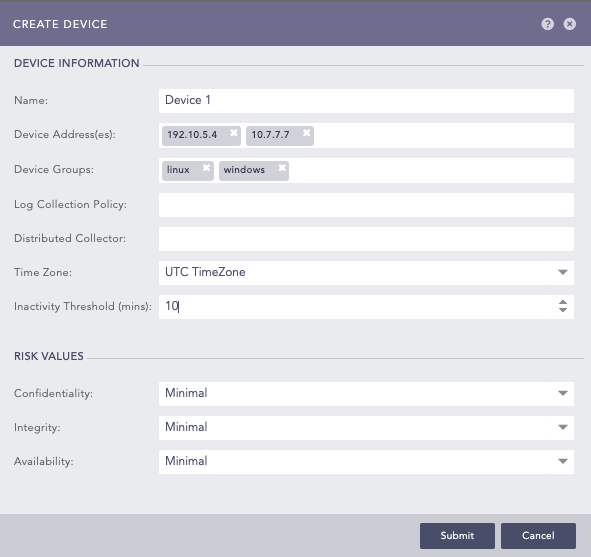
Enter the device’s Name.
Enter IP addresses or hostnames in Device address(es). IP addresses is allocated within a /16 network, allowing up to 65,536 addresses. Hostnames must follow the RFC-compliant format. A hostname can resolve to multiple IP addresses, and it is counted as a single node.
Important
By default, Logpoint docker bridge uses the IP address range 172.17.0.0/16. If there are devices in your network using the same IP range, there will be a network conflict. To avoid network conflict, go to change-docker-bip to update the docker bridge IP range.
Select Device Groups and Log Collection Policies.
Select a collector/forwarder from the Distributed Collector dropdown. It lists all the distributed collectors and syslog forwarders configured in the Distributed Logpoints. If you add more than one distributed collector, you cannot configure a fetcher for the device.
Select a Time Zone. The timezone of a device must be the same as its log source. Logpoint uses timezone to convert the timestamp in the collected logs to the timezone of the user searching the logs. If the timezones do not match, you may not see search results in the expected timeframe.
For example, if you are working in London and want to add two different devices located in Cairo and Brisbane, add the timezones as GMT+2:00 (Cairo) and GMT+10:00 (Brisbane).
Important
For localhost devices, we recommend not changing the timezone and keeping it set to UTC. Changing the timezone can delay log collection.
Enter the Inactivity Threshold in minutes. It specifies the time after which to mark the device as inactive in Last Log Received under device lists if no logs are received. You can enter a value from 5 to 525600.
Select RISK VALUES for the device. Logpoint uses the values to calculate the risk levels of any alerts generated from the device. For details, see step 19 of Creating an Alert Rule.
Adding a new device
Click Submit.
In Available Collectors/Fetchers, select the relevant collectors and fetchers for the device.

Collectors and Fetchers
Click Submit.
To add collectors and fetchers on the existing devices, click the Add Collectors/Fetchers icon under Actions. Go to Built-in Collectors and Built-in Fetchers to configure the built-in collectors and fetchers.
You can add more than one device at once using ADD BULK DEVICES.
Go to Settings >> Configuration from the navigation bar and click Devices.
Click ADD BULK DEVICES.
Adding Bulk Devices
Update the information in PROPERTY.
Click Add.
Click Submit.
The devices will be listed in BULK ADD. You can remove it by clicking the Remove ( ) icon under Actions.
You can add one or multiple devices at a time by importing them via a CSV file.
The first row of the CSV file must be a header with the following column names:
device_name
device_ips
device_groups
log_collection_policies
distributed_collector
confidentiality
integrity
availability
timezone
The device_name and device_ips fields are mandatory. The values provided for all the non-mandatory fields must already exist in Logpoint. For example: If you add windows in the list of device_groups, windows device group should already exist in Lopoint.
The field values are separated with a comma (,) but if a field has multiple values, it should be separated by a semicolon (;).
Logpoint predefines which timezone values you need to use in the CSV file. Use the names exactly as listed in the List of Timezones.
To import devices via a CSV file:
During device import, click Jobs to check the status of the import.
Go to Settings >> Configuration from the navigation bar and click Devices.
Click IMPORT.
Browse to the CSV file.
Click Submit.
You can also configure Syslog Collector while importing devices via a CSV file.
If you want the device to use a proxy, add the uses_proxy, proxy_ip, hostname of the source, and processpolicy fields in the header row and the value of uses_proxy for the corresponding device must be TRUE.
If you want the device to be used as a proxy, add the use_as_proxy, charset, and parser fields in the header row and the value of use_as_proxy for the corresponding device must be TRUE.
Proxy settings are not available for Classless Inter-Domain Routing.
When editing a device used as a proxy server by Log Sources, you must change the proxy configuration. Go to Editing a Log Source for more details.
If a device’s IP address is changed or removed, users will not have access to its logs unless they have full object permission. If the device name is not changed and they have full permission for the device, they can access the logs. Conversely, if only the device name is changed but the IP address remains the same, users can access it as long as they have full permissions.
Go to Settings >> Configuration from the navigation bar and click Devices.
Click the Name of the device.
Update the information.
Update the collectors/fetchers for the device.
Click Submit.
When deleting a device used as a proxy server by Log Sources, you must change the proxy configuration. Go to Editing a Log Source for more details. When a device is deleted, its logs are not deleted.
Only users with full object permission can view the logs after this device is deleted.
Go to Settings >> Configuration from the navigation bar and click Devices.
Click the Delete ( ) icon under Actions of the device.
To delete multiple devices, select the devices. Click MORE and choose Delete Selected.
To delete all the devices, click MORE and choose Delete All.

Deleting Devices
Click Yes to confirm deletion.