Label Packages
Label Packages are the collection of labelling rules. Labels are tags applied to each log message, used to characterize logs and group similar logs. For example, you can label all the login failed logs as failed. Using the label failed, you can group all the logs where the user failed to log in successfully.
Labels can also be used to identify logs related to a specific threat technique or potential security attack.
Types of Label Packages:
Vendor Packages: The label packages bundled with the Logpoint installation.
My Packages: The label packages that you add.
You can switch between My Packages and Vendor Packages by clicking the dropdown menu at the top-left corner.
To sort the columns in ascending or descending order, move your cursor to the column you want to sort. Click the Down Arrow ( ) for ascending order and the Up Arrow (
 ) for descending order.
To display Version in the UI, click the MORE dropdown, click Columns, and select Version.
Adding a Label Package
Go to Settings >> Knowledge Base and click Label Packages.
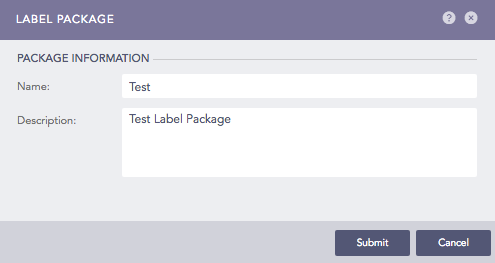
Click ADD.
Enter Name and Description in Package Information.
Enter a Name and a Description.
Click Submit. Search Labels opens, containing all the existing search labels.
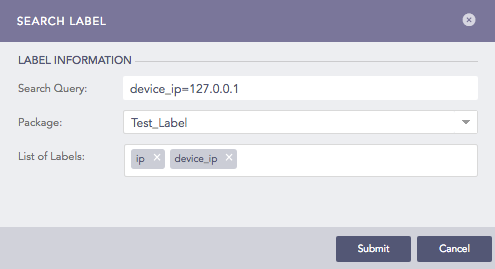
Click ADD to add a new label.
In Label Information, enter Search Query, select Package and enter List of Labels. Labels can contain only alphanumeric characters.
In LABEL INFORMATION, enter a Search Query, select a Package and enter a List of Labels.
Click Submit.
In this example, all the log messages satisfying the search query device_ip = 127.0.0.1 are labeled with ip and device_ip.
Applying Labels with Label Package
Go to Settings >> Knowledge Base and click Label Packages.
Click Manage Labels ( ) icon in Actions for the specific label.
Click Add.
Switch between the My Packages and the Vendor Packages by clicking the dropdown at the top-left corner of the panel.
Applying Labels from the Search Interface
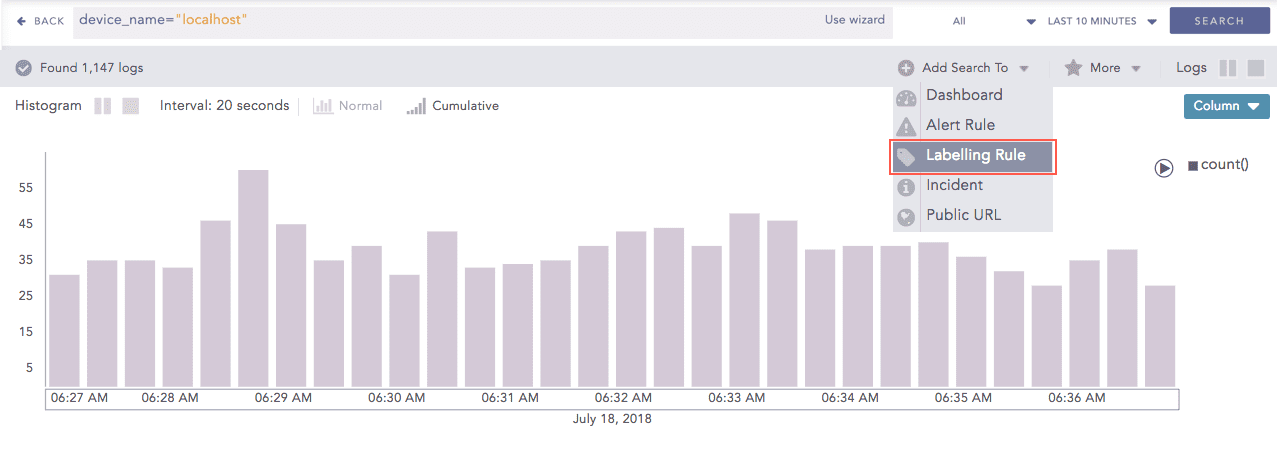
Go to Search and enter the query to which you want to add the labels.
Click Search.
Click Add Search To.
Select Labelling Rule to open the Search Label.
Select a Package, and enter a List of labels.
Click Submit.
Applying Labels using Normalization Signatures
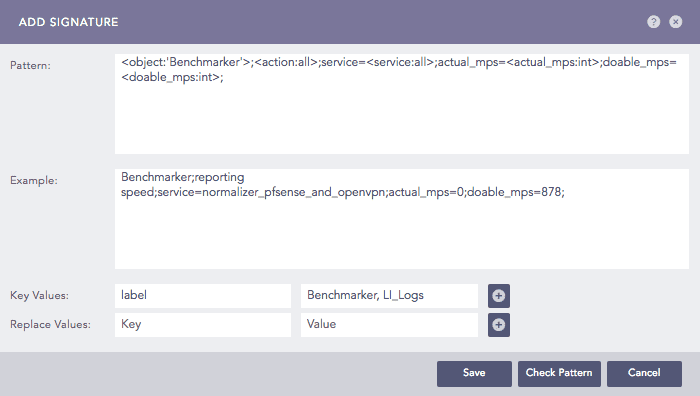
You may need to add a label to particular types of logs or the logs collected by a specific device. For example, to add a label printer to all the logs collected from the printer, you can add a label to the signature of the normalization package that is used to normalize printer logs. This will add the label to all the logs processed by that normalization package. You can also add labels while adding a normalization signature.
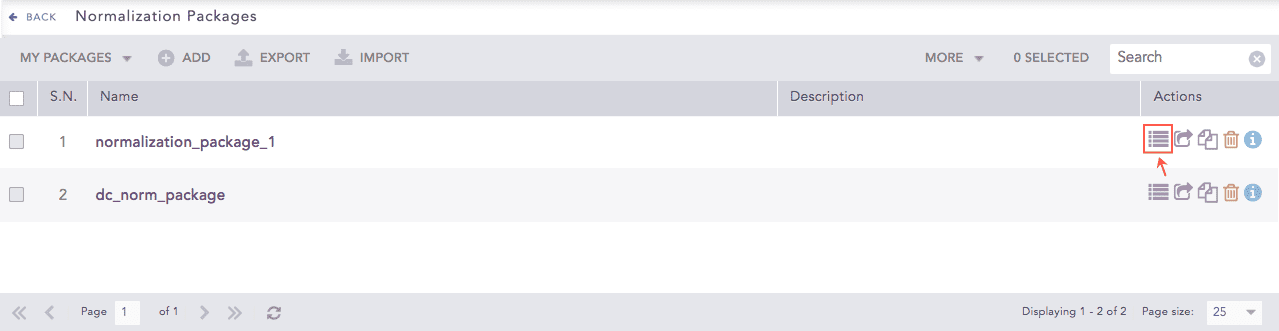
Go to Settings >> Knowledge Base and click Normalization Packages.
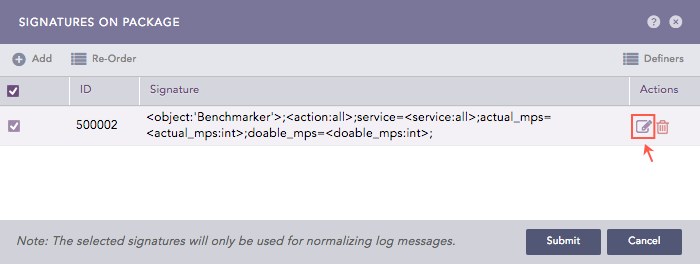
Click Signatures () in Actions.
Click Edit Signature icon in Actions.
Type label in the first textbox for Key Values.
Enter a list of labels in the second textbox.
Type label in the first textbox for Key Value.
Enter a list of labels in the second textbox and click Submit.
Applying Labels with Labeling Rules
Go to Settings >> Knowledge Base from the navigation bar and click Label Packages.
Click the Manage Labels () icon in Actions for the respective label.
Click Add to open Search Label.
Enter a suitable Query, a Package Name, and a List of Labels.
Click Submit.
In this example, all the log messages satisfying the search query device_name = localhost are labelled with Localhost and 127.0.0.1.
Exporting Label Packages
Go to Settings >> Knowledge Base from the navigation bar and click Label Packages.
Select the label packages you want to export.
Click EXPORT.
The selected label package will be downloaded.
Importing Label Packages
Go to Settings >> Knowledge Base from the navigation bar and click Label Packages.
Click IMPORT.
Browse to the label package.
Click Submit.
Editing a Label Package
Go to Settings >> Knowledge Base from the navigation bar and click Label Packages.
Click the Name of the package that to edit and update the information.
Click Submit.
Activating Label Packages
Go to Settings >> Knowledge Base and click Label Packages.
Click Activate label package icon under Actions.
To activate multiple Label Packages, select all the packages you want to activate. Click MORE and choose Activate Selected Packages.
To activate all the Label Packages, click MORE and choose Activate All Packages.
De-activating Label Packages
Go to Settings >> Knowledge Base and click Label Packages.
Click De-activate label package icon under Actions.
To deactivate multiple label packages, select all the packages you want to deactivate. Click MORE and choose Deactivate Selected Packages.
To deactivate all the label packages, click MORE and choose Deactivate All Packages.
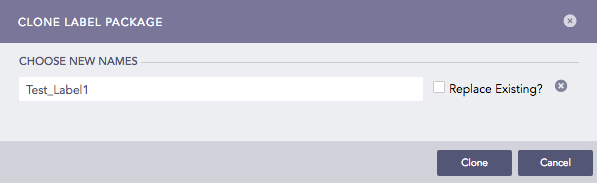
Cloning Label Packages
Go to Settings >> Knowledge Base and click Label Packages.
Click the Clone icon under Actions.
To clone multiple label packages, select all the packages you want to clone. Click MORE and select Clone Selected Packages.
To clone all label packages, click MORE and select Clone All Packages.
Enter new names for the cloned packages.
Select Replace Existing? to replace an existing package with the same name.
Click Clone.
Deleting Label Packages
Go to Settings >> Knowledge Base and click Label Packages.
Click Delete ( ) icon under Actions.
To delete multiple Label Packages, select all the packages you want to delete. Click MORE and choose Delete Selected Packages.
To delete all the Label Packages, click MORE and choose Delete All Packages.
Click Yes.