Search Template stores search queries with placeholders. The stored queries are called base queries. The placeholders in the base queries are used as variables which you can replace with actual search keywords during runtime. You can save multiple base queries in a search template and use them to run search queries or create dashboard widgets. The search templates remember the last visualization used on the widgets. You can drill-down on the search results from the non-edit mode of the widget of the search templates.
My Search Templates contains all the search templates you have created or cloned. The vendor search templates are grouped under Vendor Search Templates and those shared by other users are grouped under Shared Search Templates.
The created search templates are automatically shared with the users in the Logpoint Administrator user group.
Go to Search Templates from the navigation bar.
Click Add.
Enter a Name and Description.
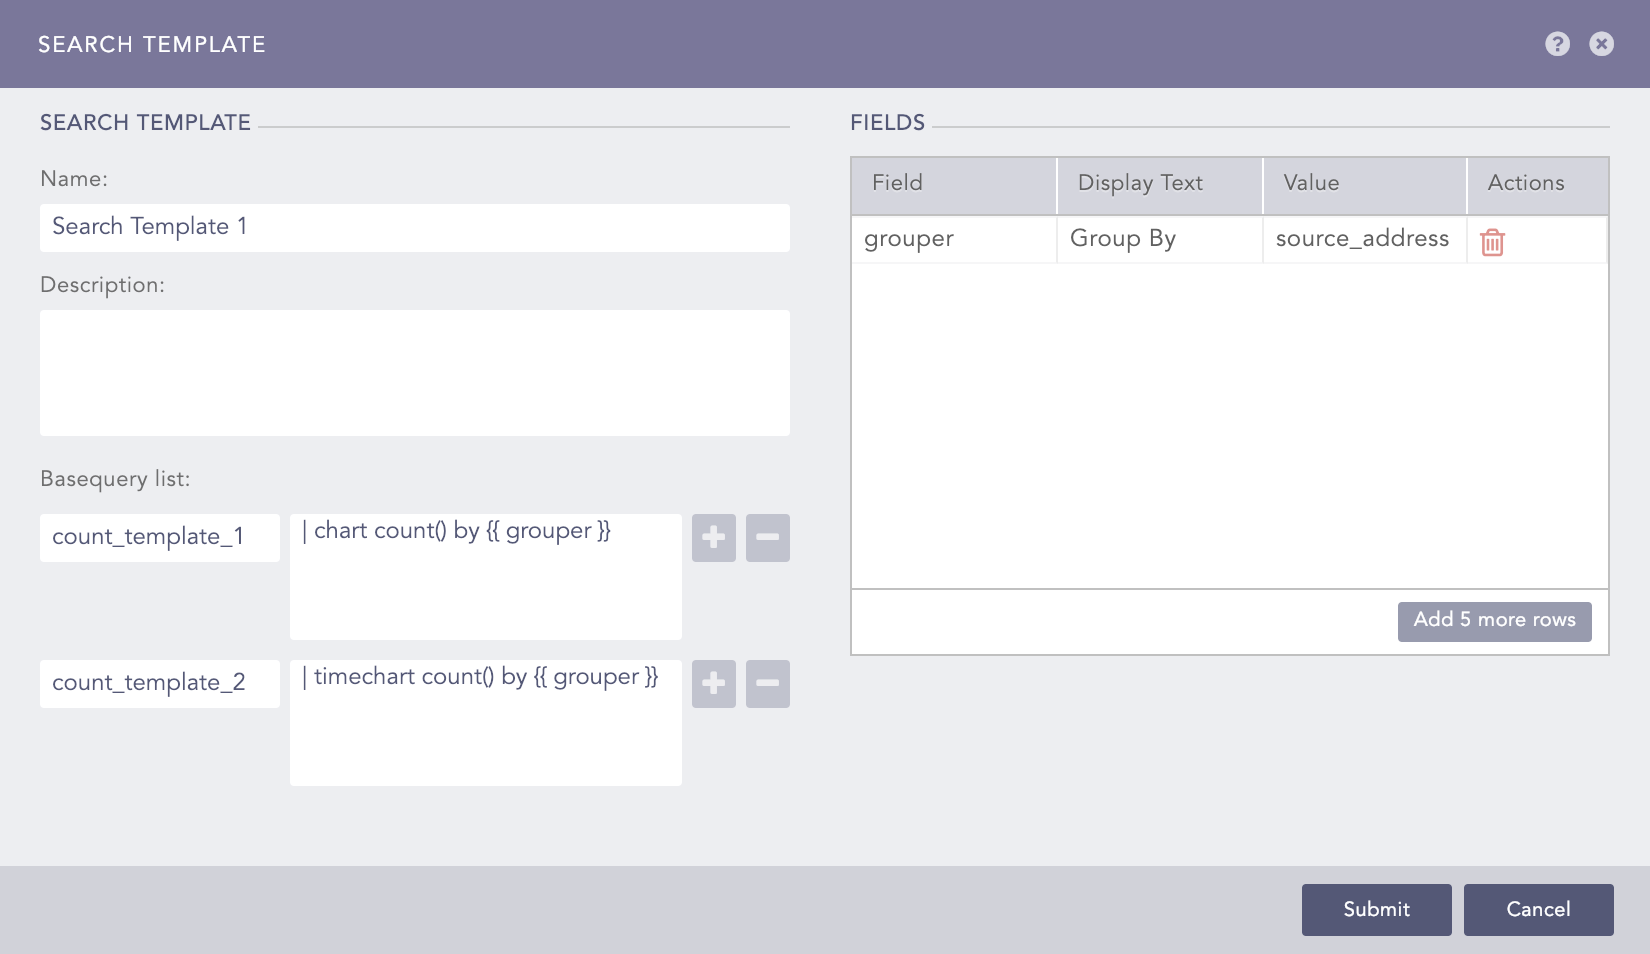
Adding a Search Template
Enter the base queries in Basequery list. Enter a name and a query for each base query. Use {{ and }} to enclose placeholders in the queries. Click the Plus icon to add new base query fields and the Minus icon to remove the corresponding field.
In Fields, enter a Field used as a placeholder in any of the base queries, a Display Text for the field, and a default Value. You can enter multiple values for Field, Display Text, and Value.
Click Submit.
Click the ? icon near the top-right corner to get help on the inputs.
Go to Search Templates from the navigation bar.
Select the templates to export.
Click Export.
Save the exported template.
The imported search templates are automatically shared with the users in the Logpoint Administrator user group.
Go to Search Templates from the navigation bar.
Click Import.
Browse for the template package file.
Click Upload.
Go to Search Templates from the navigation bar.
Click the Edit icon in Actions of the search template and update the information.
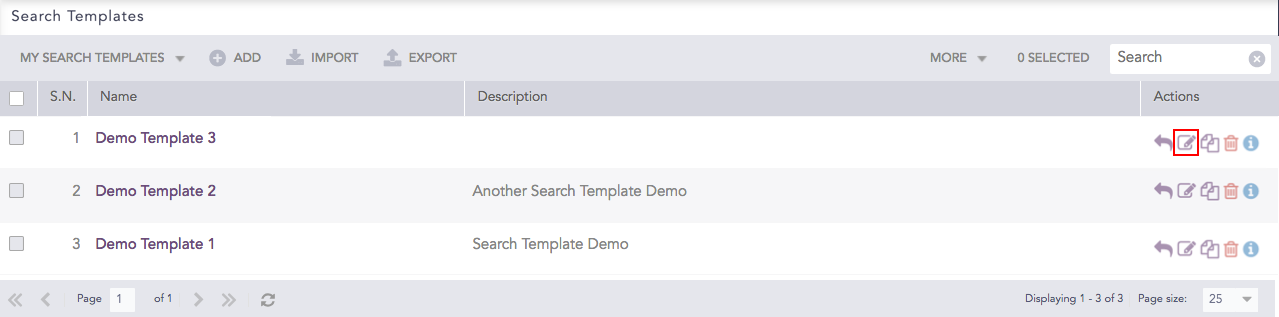
Editing a Search Template
Click Submit.
You can share a search template with all the users in the system and give them the read, edit, or full permissions. Any changes made in the search templates are visible to all the shared users.
Each parameter in a shared search template is categorized into three types:
Global parameters can be changed only by the users with the Edit or Full permissions. Changes in the global parameters are reflected for all the users using the shared search template. The following parameters are global:
The name, description, queries, and field values of the search template.
Title and order of tabs, including creation and deletion of tabs.
Title, query, dimensions, and positions of widgets, including addition and deletion of widgets.
Personalized parameters can be changed by all the users. However, the changes in the personalized parameters are reflected only for the users making the change. The following parameters are personalized:
The updateable parameters
Selected repos
Time range
Hybrid parameters can be changed by all the users. If the user changing the parameters has the Edit or Full permissions, the changes are reflected for all the users. However, if the user has only the Read permission, the changes are reflected only for the user making the change. The following parameters are hybrid:
Chart types of widgets
Legends and legend labels of widgets
Trend state of widgets
If a user with the Edit or Full permissions changes a hybrid parameter, the changes made by all other users are overridden.
A user with the Full permission can also Share and Delete a shared search template.
To share a search template:
Go to Search Templates from the navigation bar.
Click the Share Template icon under Actions of the template you would like to share.
Search Templates
To share multiple Search Templates, select the respective templates. Click the MORE dropdown and choose Share Selected With Other Users.
To share all the Search Templates, click the MORE dropdown and choose Share All With Other Users.

Sharing Search Templates
Select the users groups for all the users to share the search templates with.
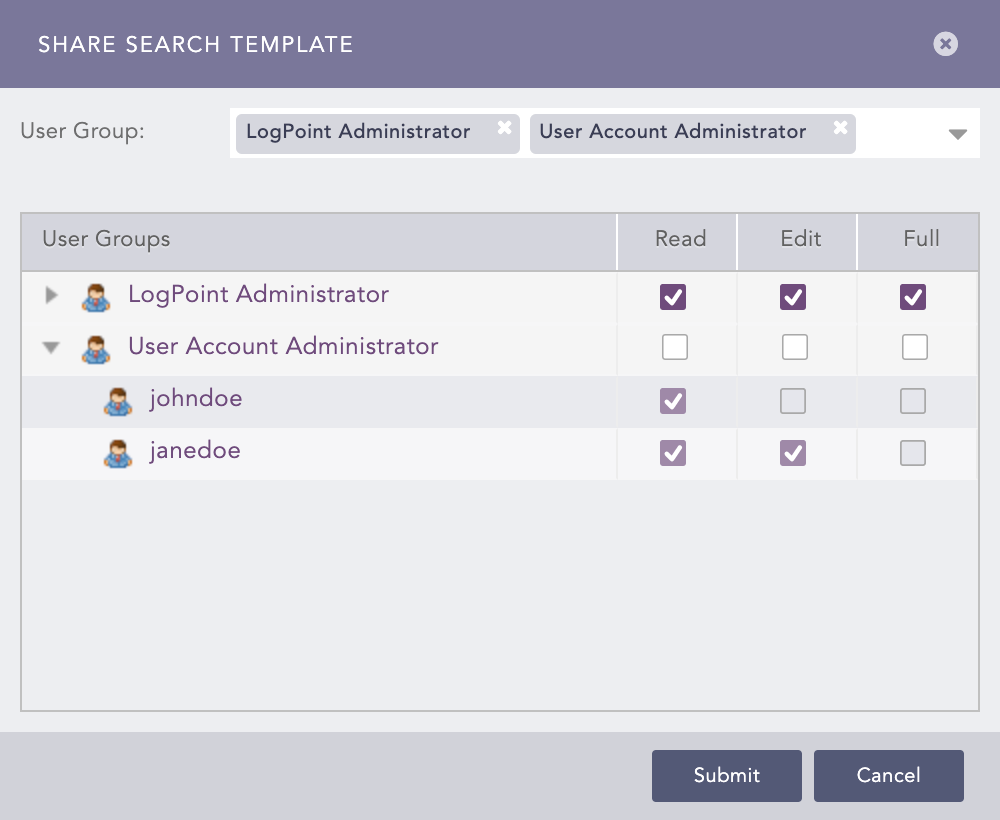
Providing permissions for a shared search template
Select the Read, Edit, or Full permissions for the users. Refer to the introduction section of Sharing Search Templates for details on user permissions.
Click Submit
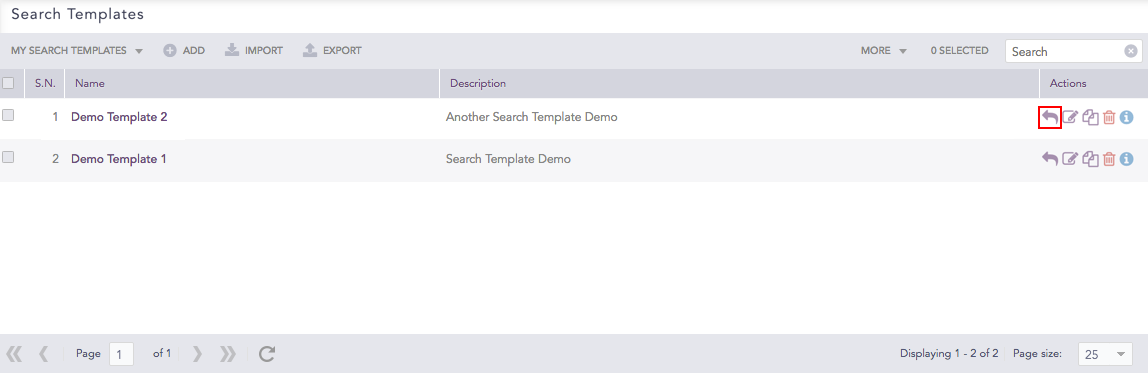
You can unshare a search template by removing the permissions for all the user groups from Share Search Template.
While deleting a shared search template’s owner, you must delete the shared template or transfer the template’s ownership to another user. You can do this from the Transfer Ownership panel that appears when you attempt to delete a user whose template is being shared.
Go to Settings >> User Accounts from the navigation bar and click Users.
De-activate the user by clicking the De-Activate User icon in Actions.
Click Manage De-Activated Users.
Click the Delete icon in Actions of the user.
Click Yes.
To transfer the ownership, select a user from the drop-down and click Submit. The transferred template is listed in the Search Templates page in the owner’s system.
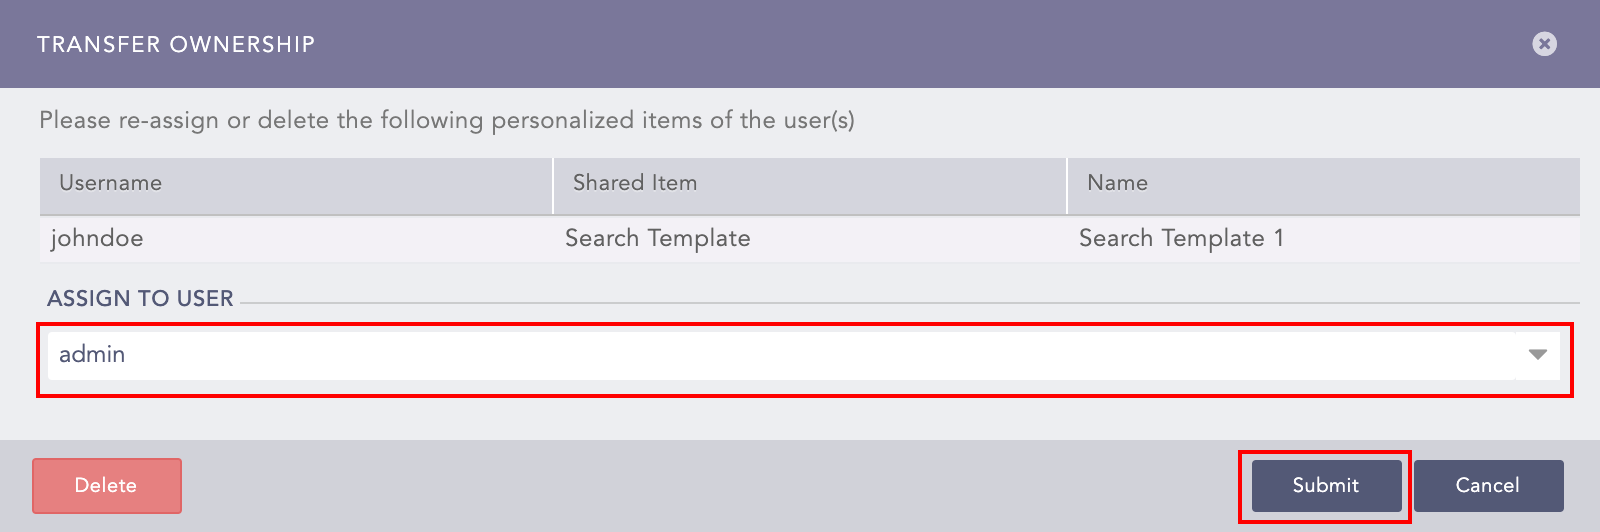
Transferring the Ownership of a Shared Search Template
To delete the user and user’s template without transferring their ownership, click Delete.
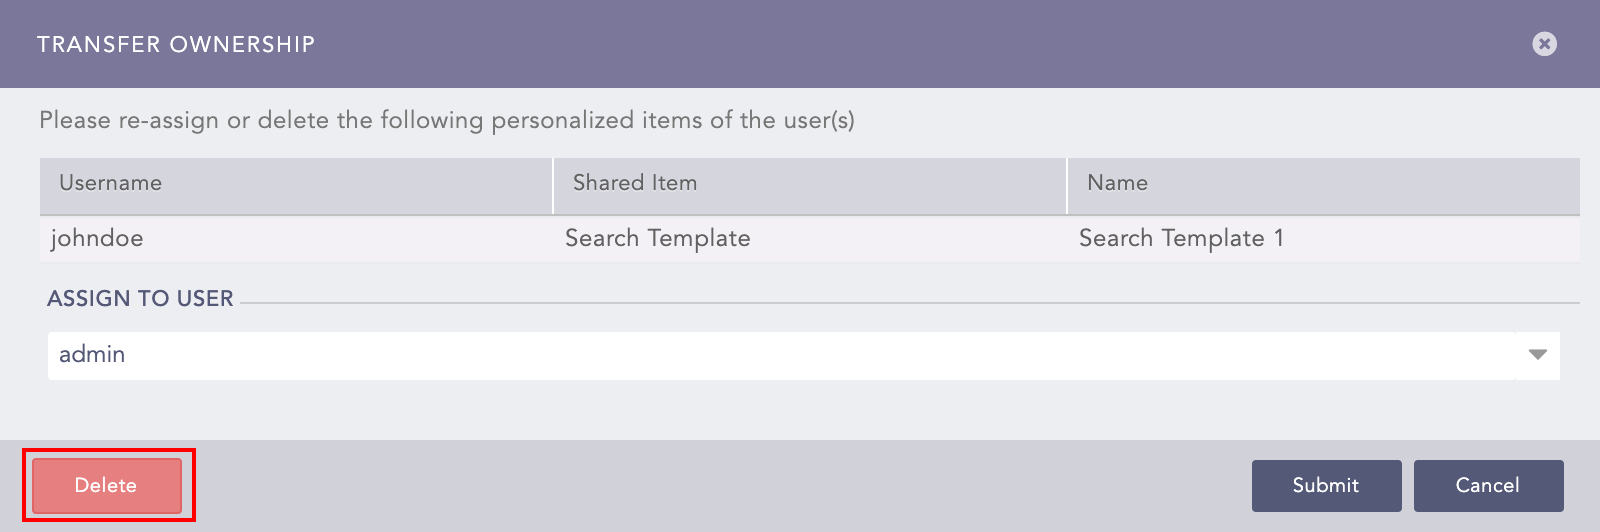
Deleting a Shared Search Template’s Owner
The cloned search templates are automatically shared with the users in the Logpoint Administrator user group.
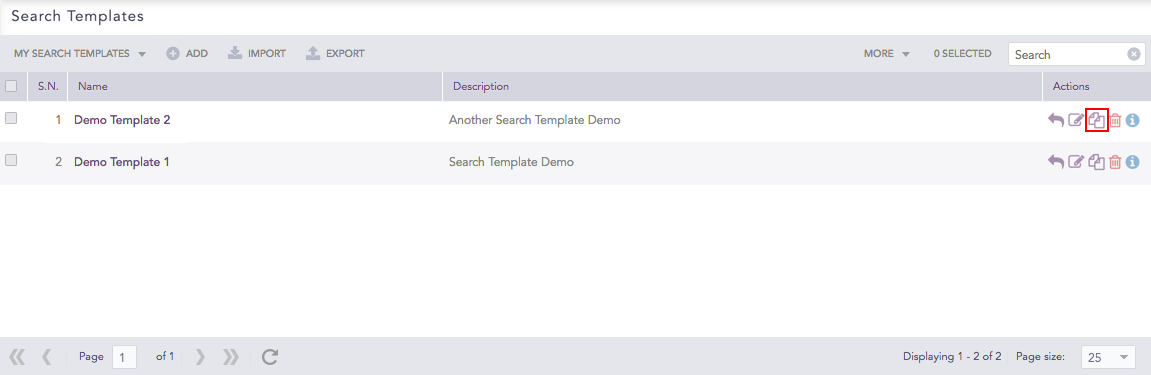
Go to Search Templates from the navigation bar.
Click the Clone icon under Actions of the template.
Search Templates
To clone multiple Search Templates, select the templates. Click the MORE dropdown and choose Clone Selected Templates.
To clone all the Search Templates, click the MORE dropdown and choose Clone All Templates.
Cloning Search Templates
Enter a new Name for the cloned template.
Select the Replace Existing? checkbox to replace an existing template with the same name.
Click Clone.
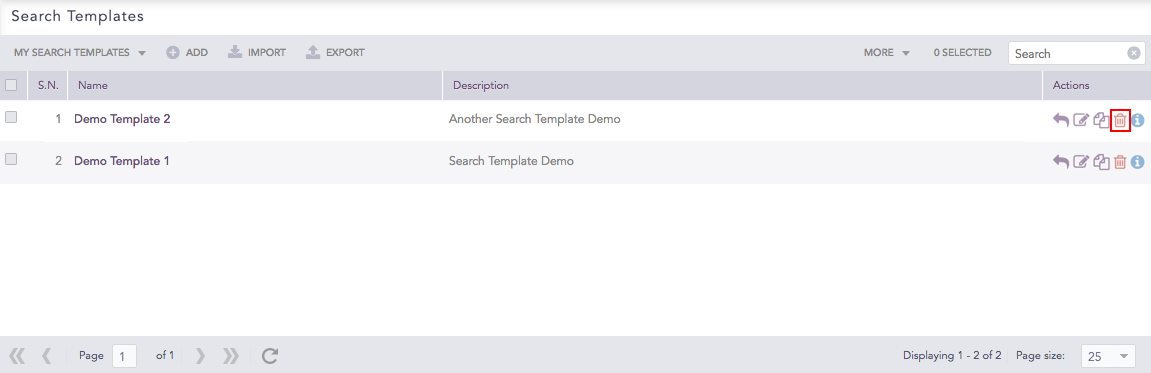
Go to Search Templates from the navigation bar.
Click the Delete icon under Actions of the template.
Search Templates
To delete multiple Search Templates, select the respective templates. Click the MORE dropdown and choose Delete Selected Templates.
To delete all the Search Templates, click the MORE dropdown and choose Delete All Templates.
Deleting Search Templates
Click Yes.
Go to Search Templates from the navigation bar.
Click the Name of the template.
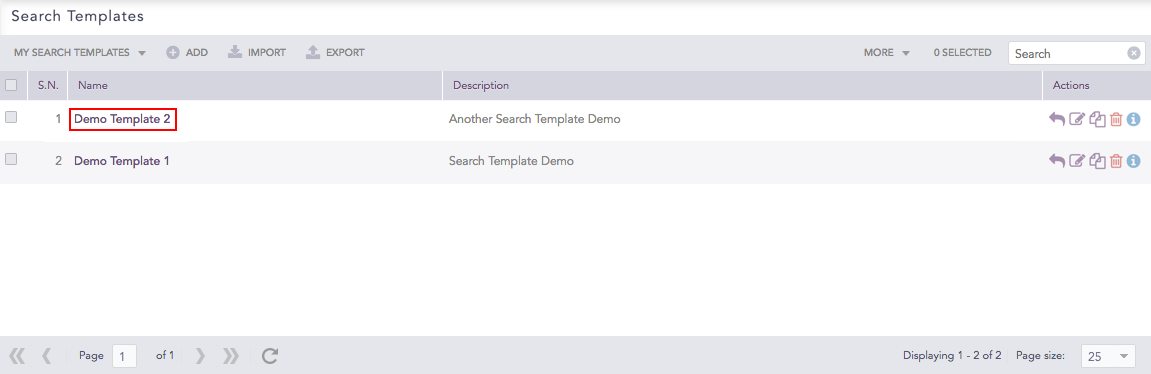
Search Templates
Logpoint forwards you to the Search Template View where you can access the dashboards of the corresponding search template. You can also view a shared search template using the same method.
From the search template view, you can perform the following tasks:
You must add at least one dashboard to use the features of the Search Template View.
Click the Plus icon at the top.
Add Dashboard
Enter the name of the dashboard.

Add Dashboard Panel
Click Ok.
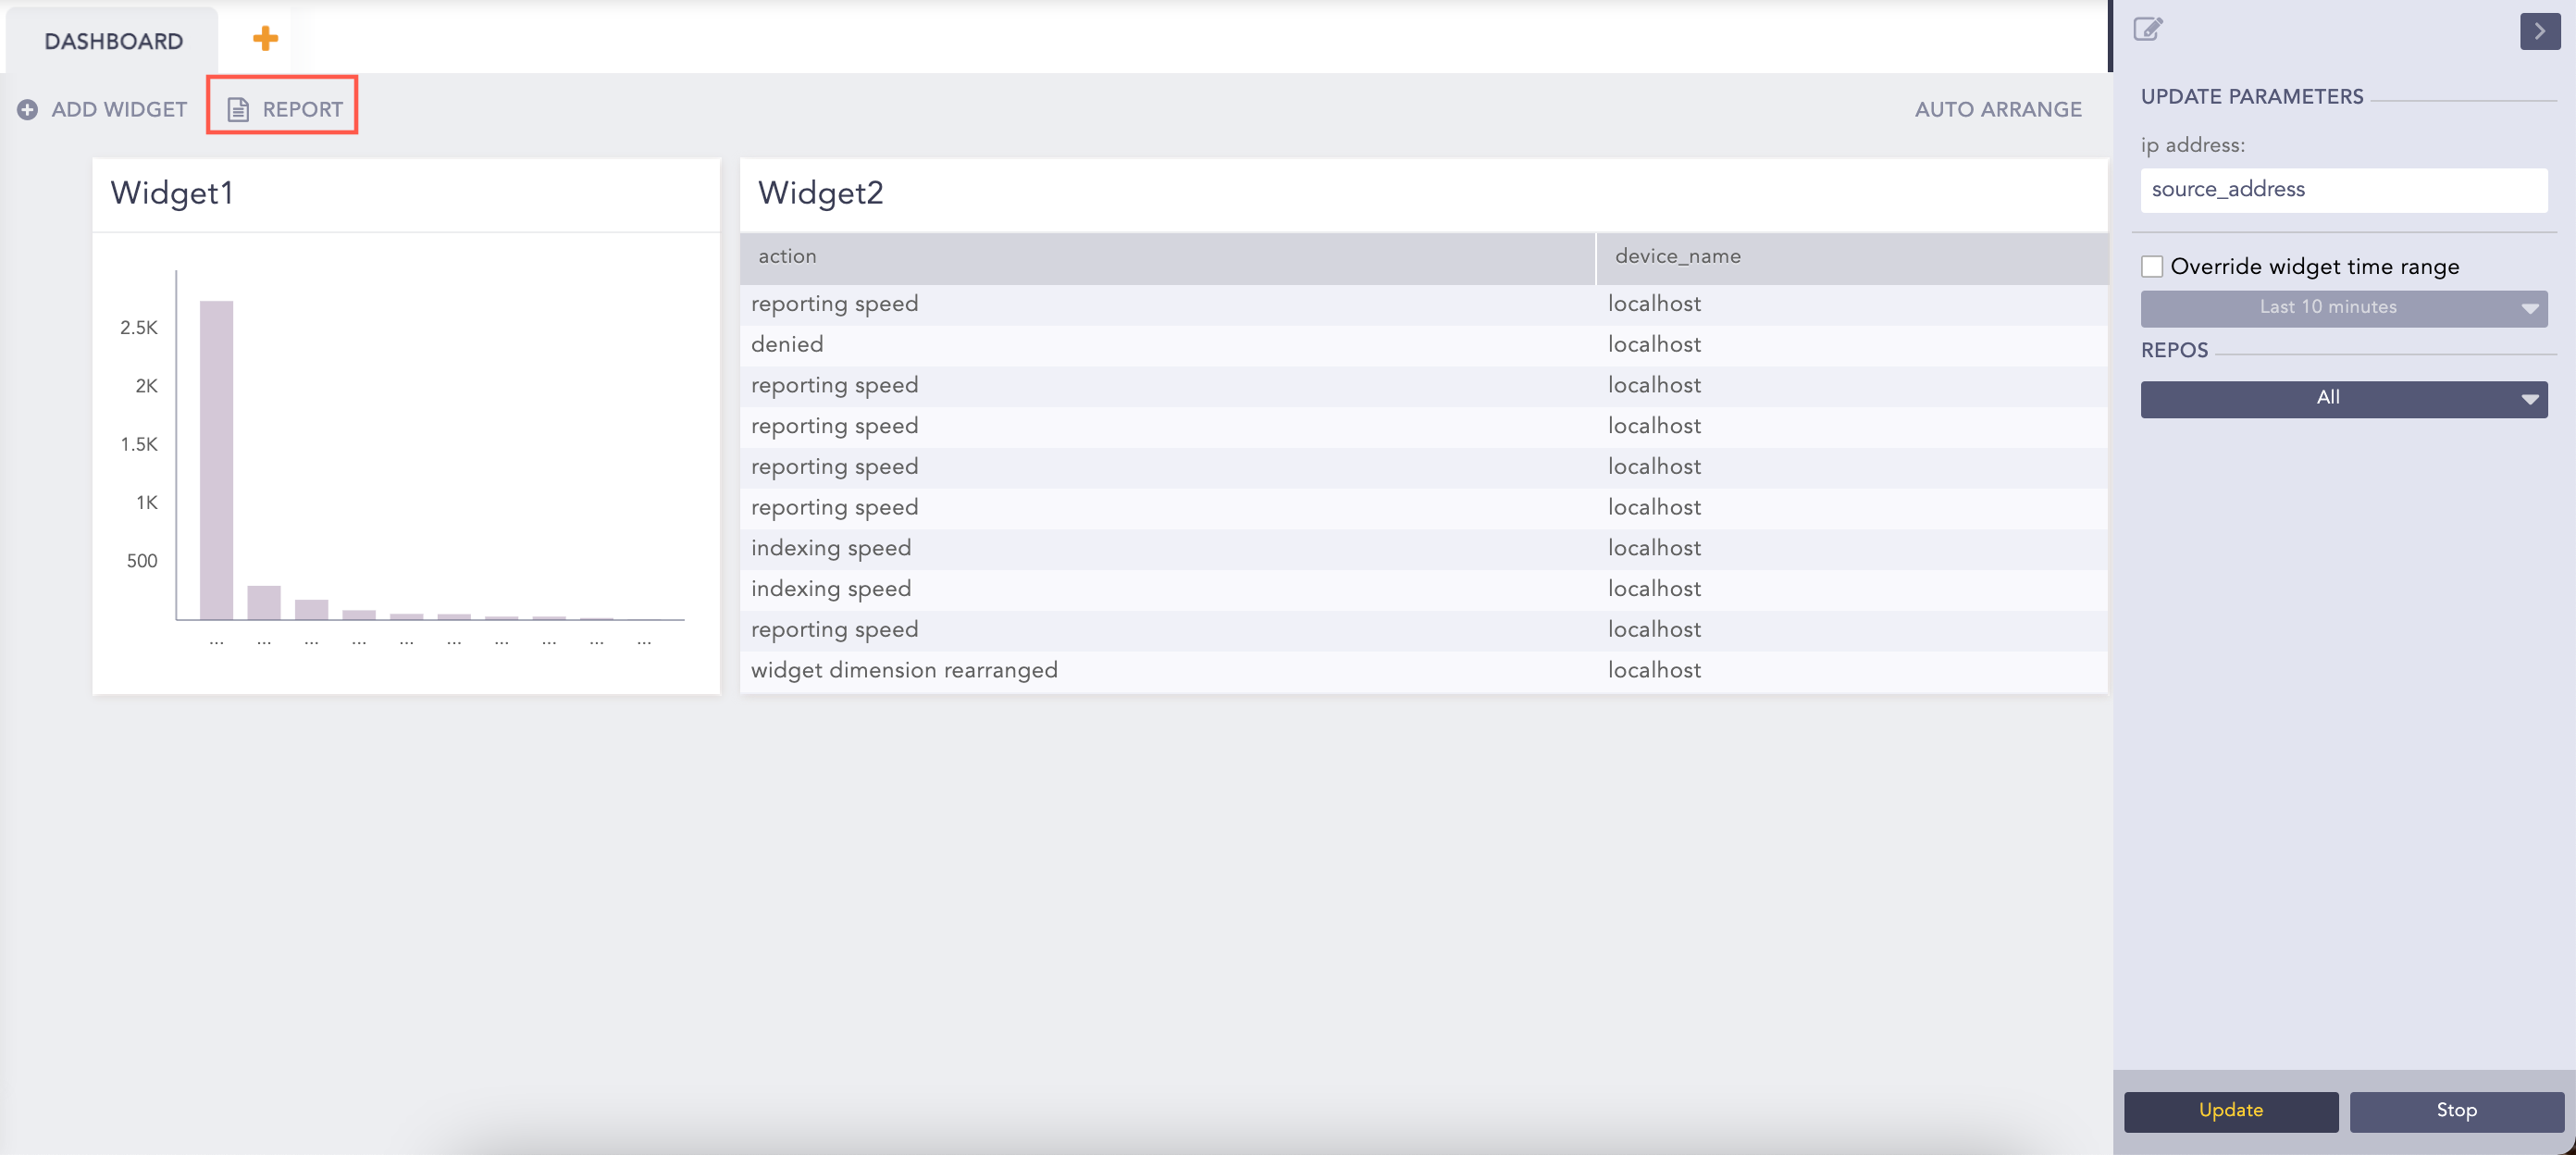
Click Add Widget.

Dashboard
Enter a Name for the widget.
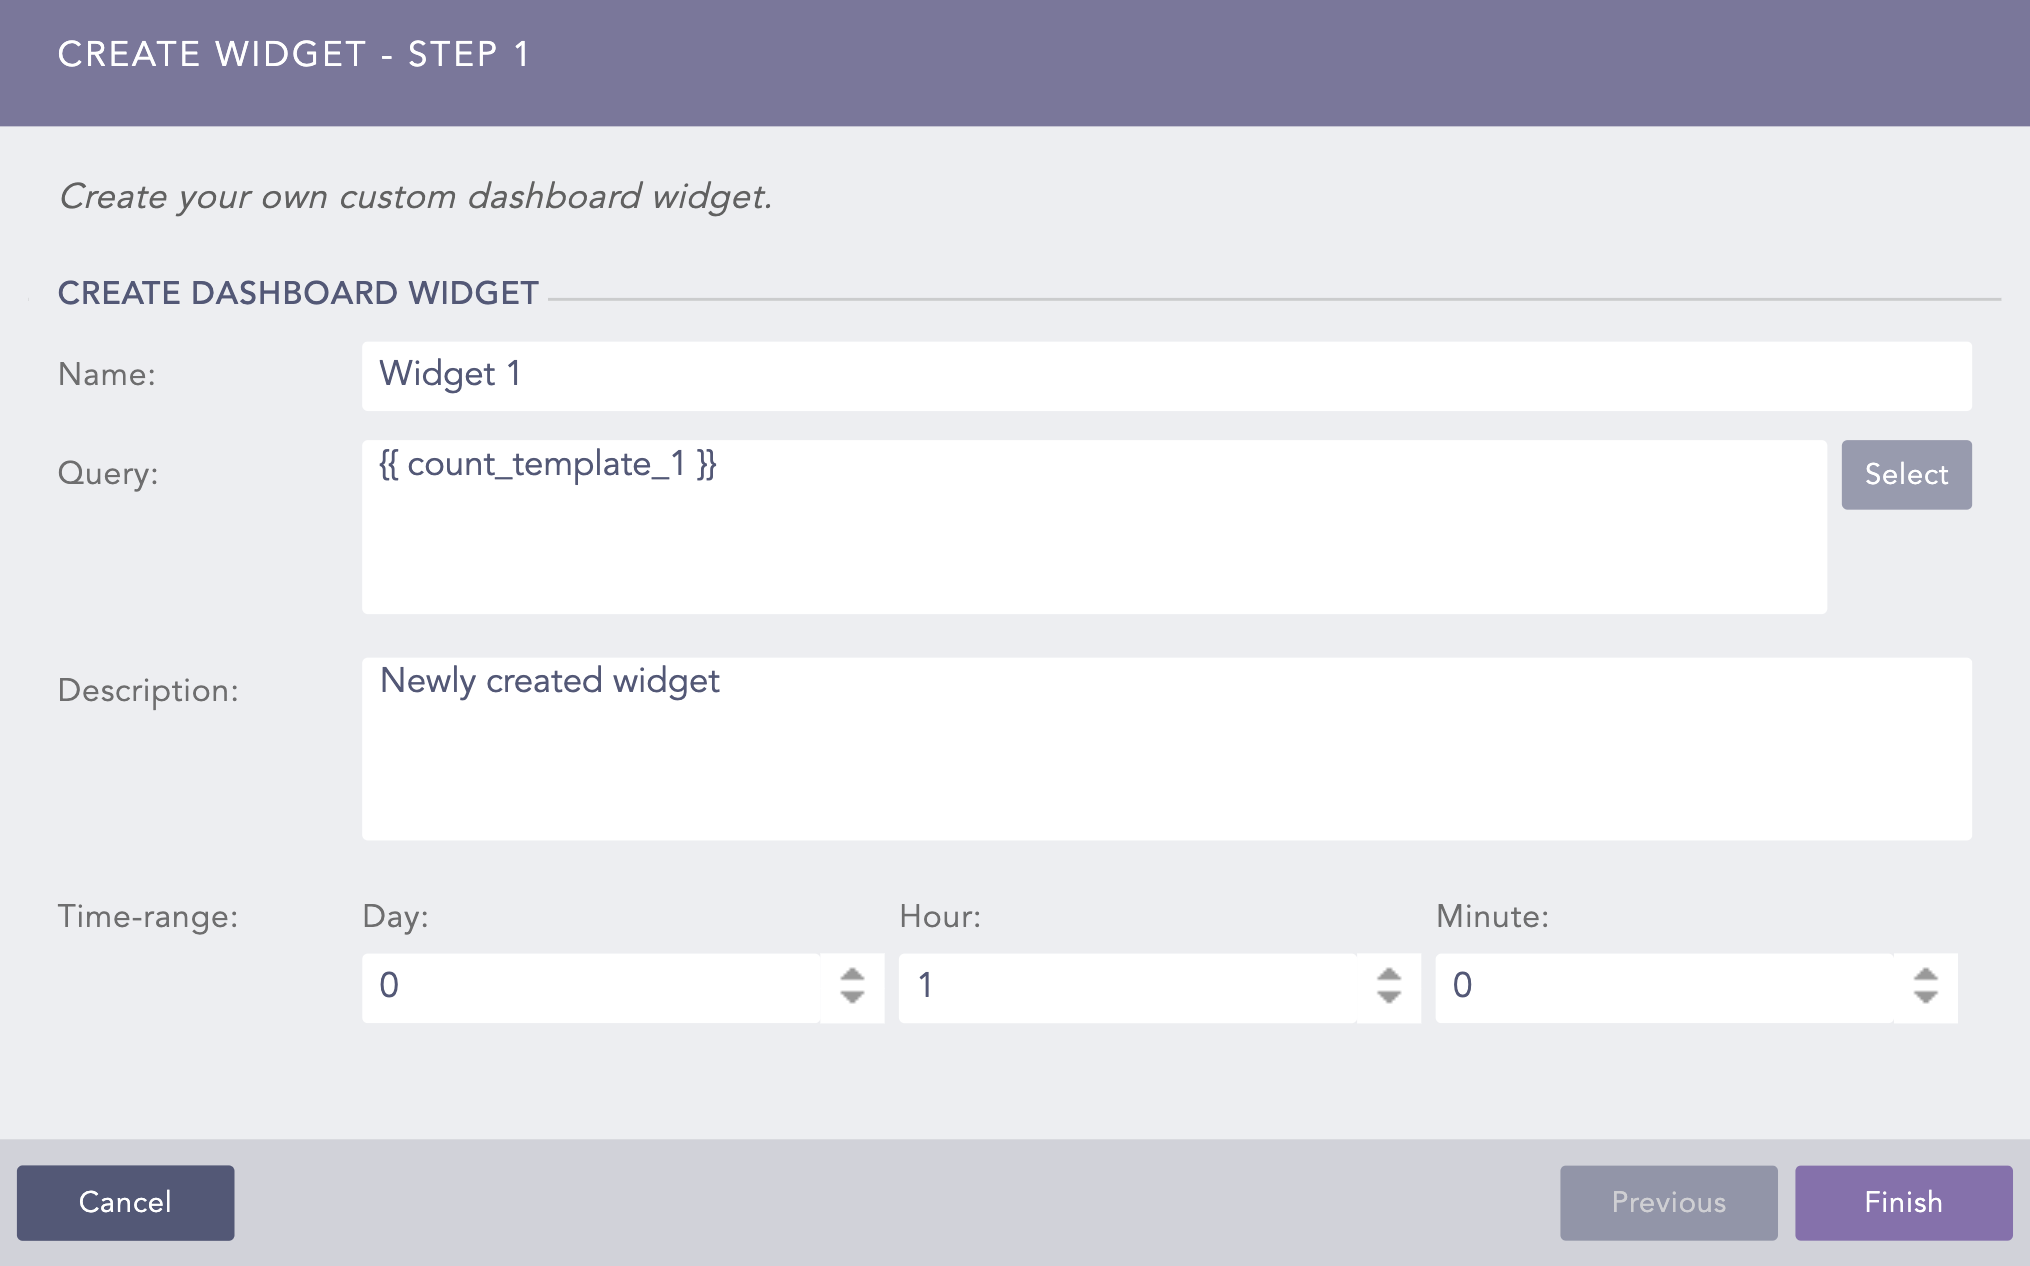
Create Widget Panel
In the Query field, enter the name of a base query within {{ and }}.
Enter a Description and a Time-range for the widget.
Click Report at the top of the dashboard.
Create Report
Enter the Report Name and an Email address.
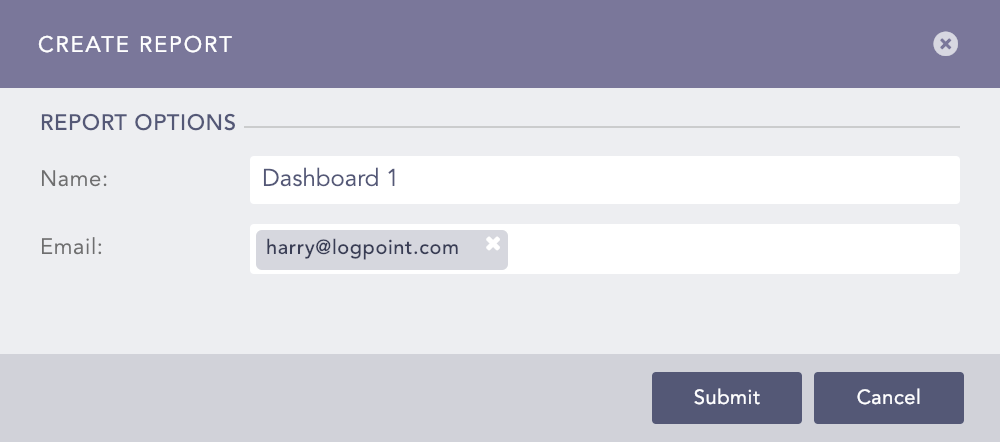
Create Report
Click Submit.
You will receive the report in the PDF format.
Click Auto Arrange to automatically arrange the widgets in a presentable form.
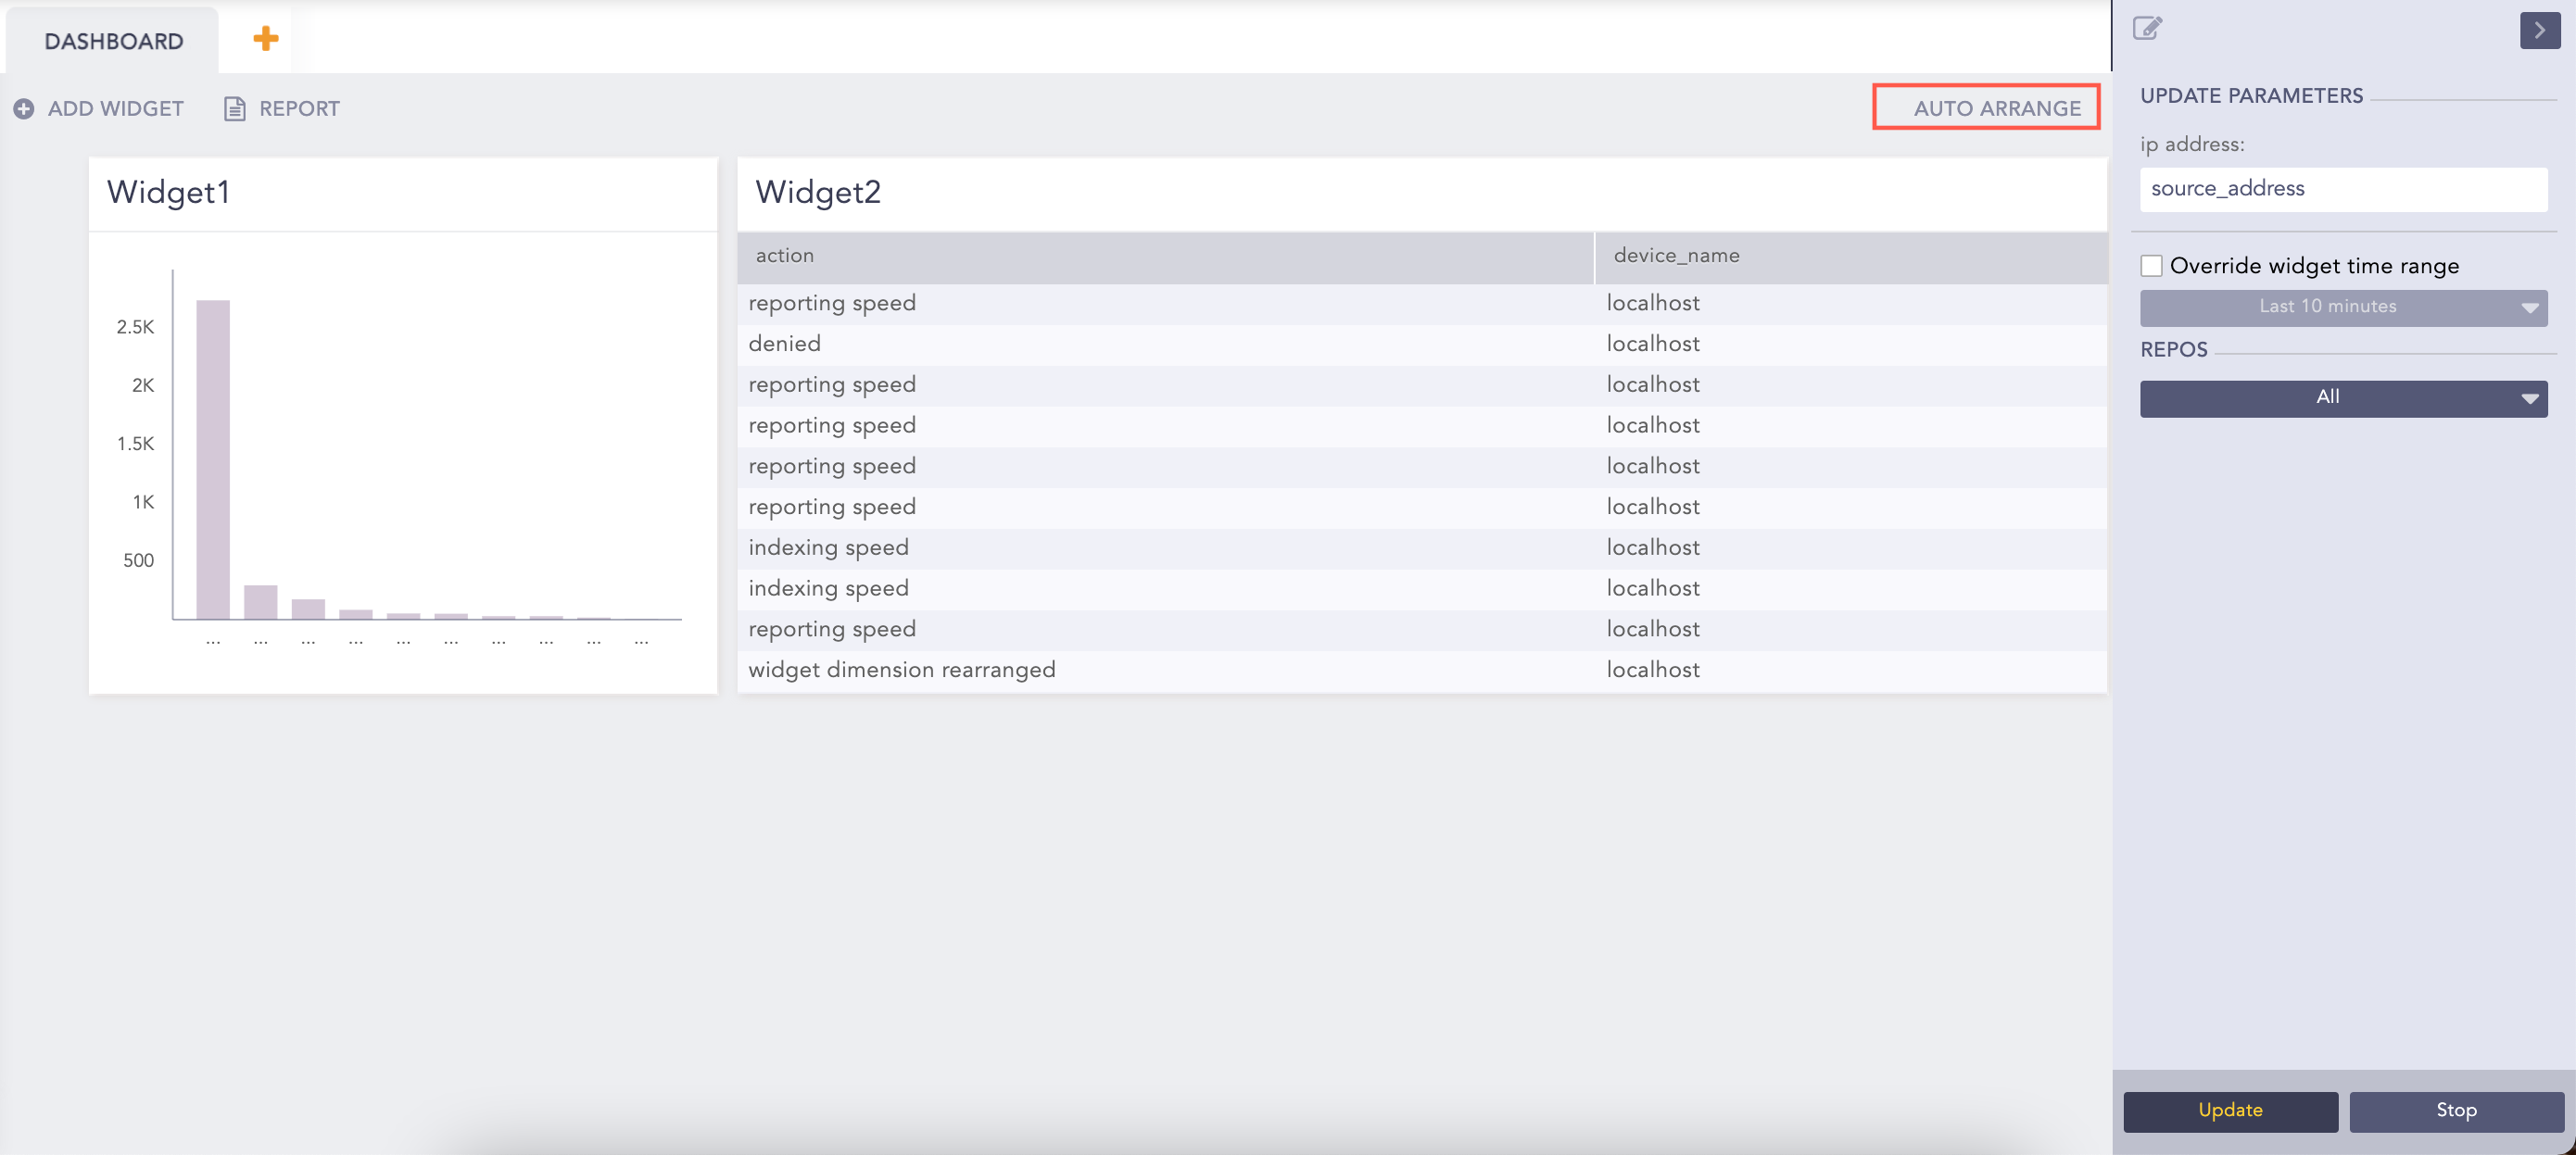
Dashboard
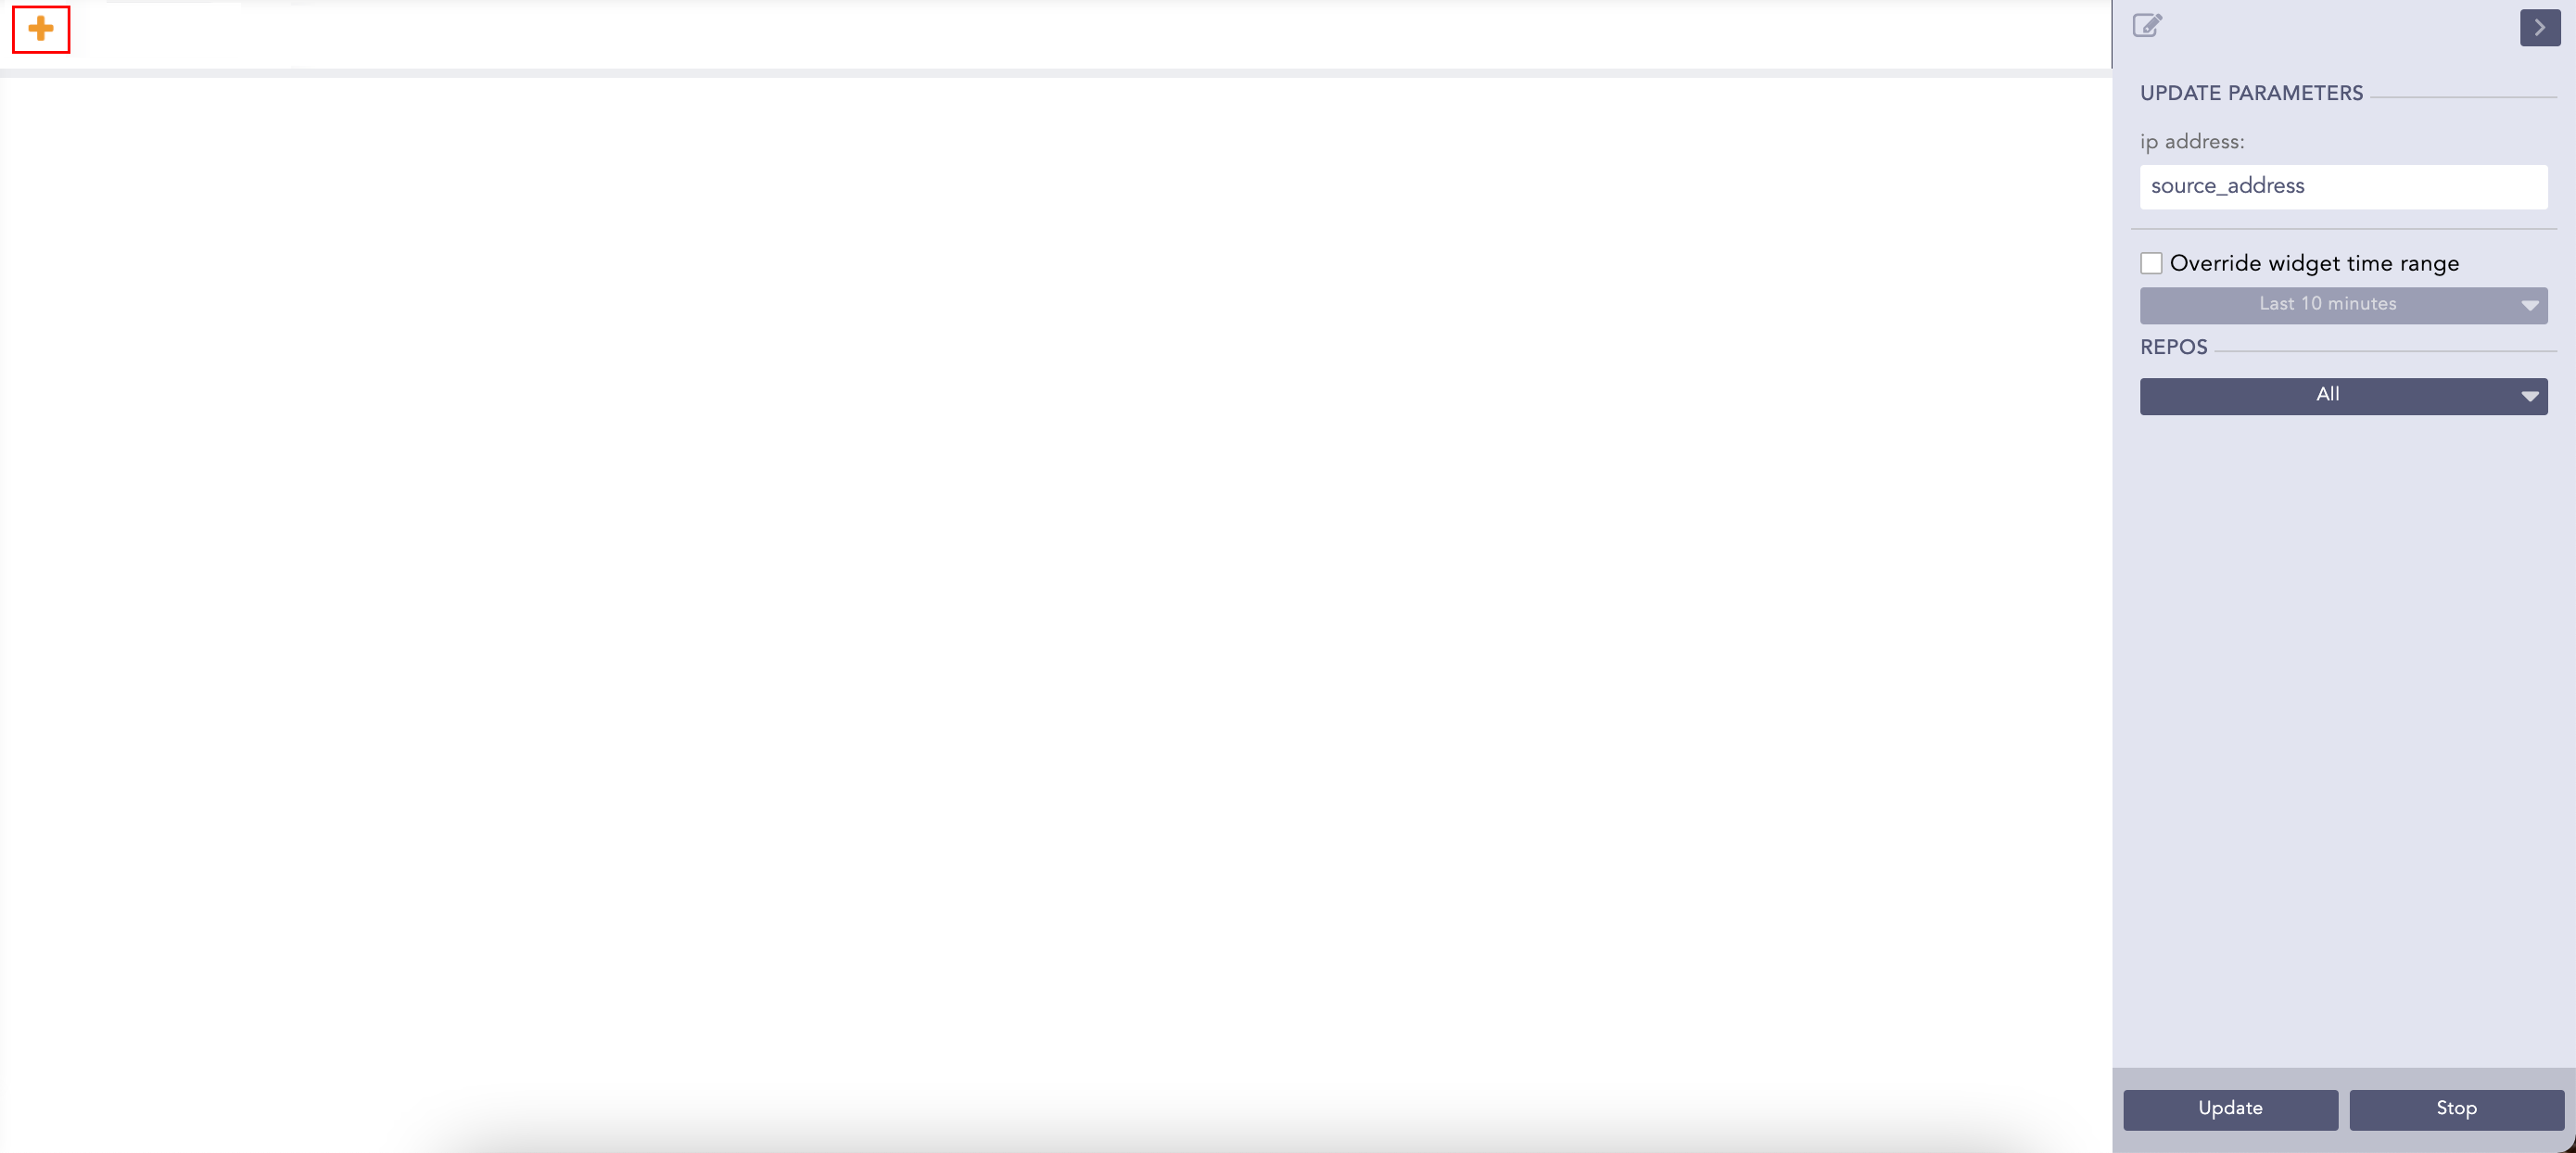
Enter the new values for the variables in the panel to the right.
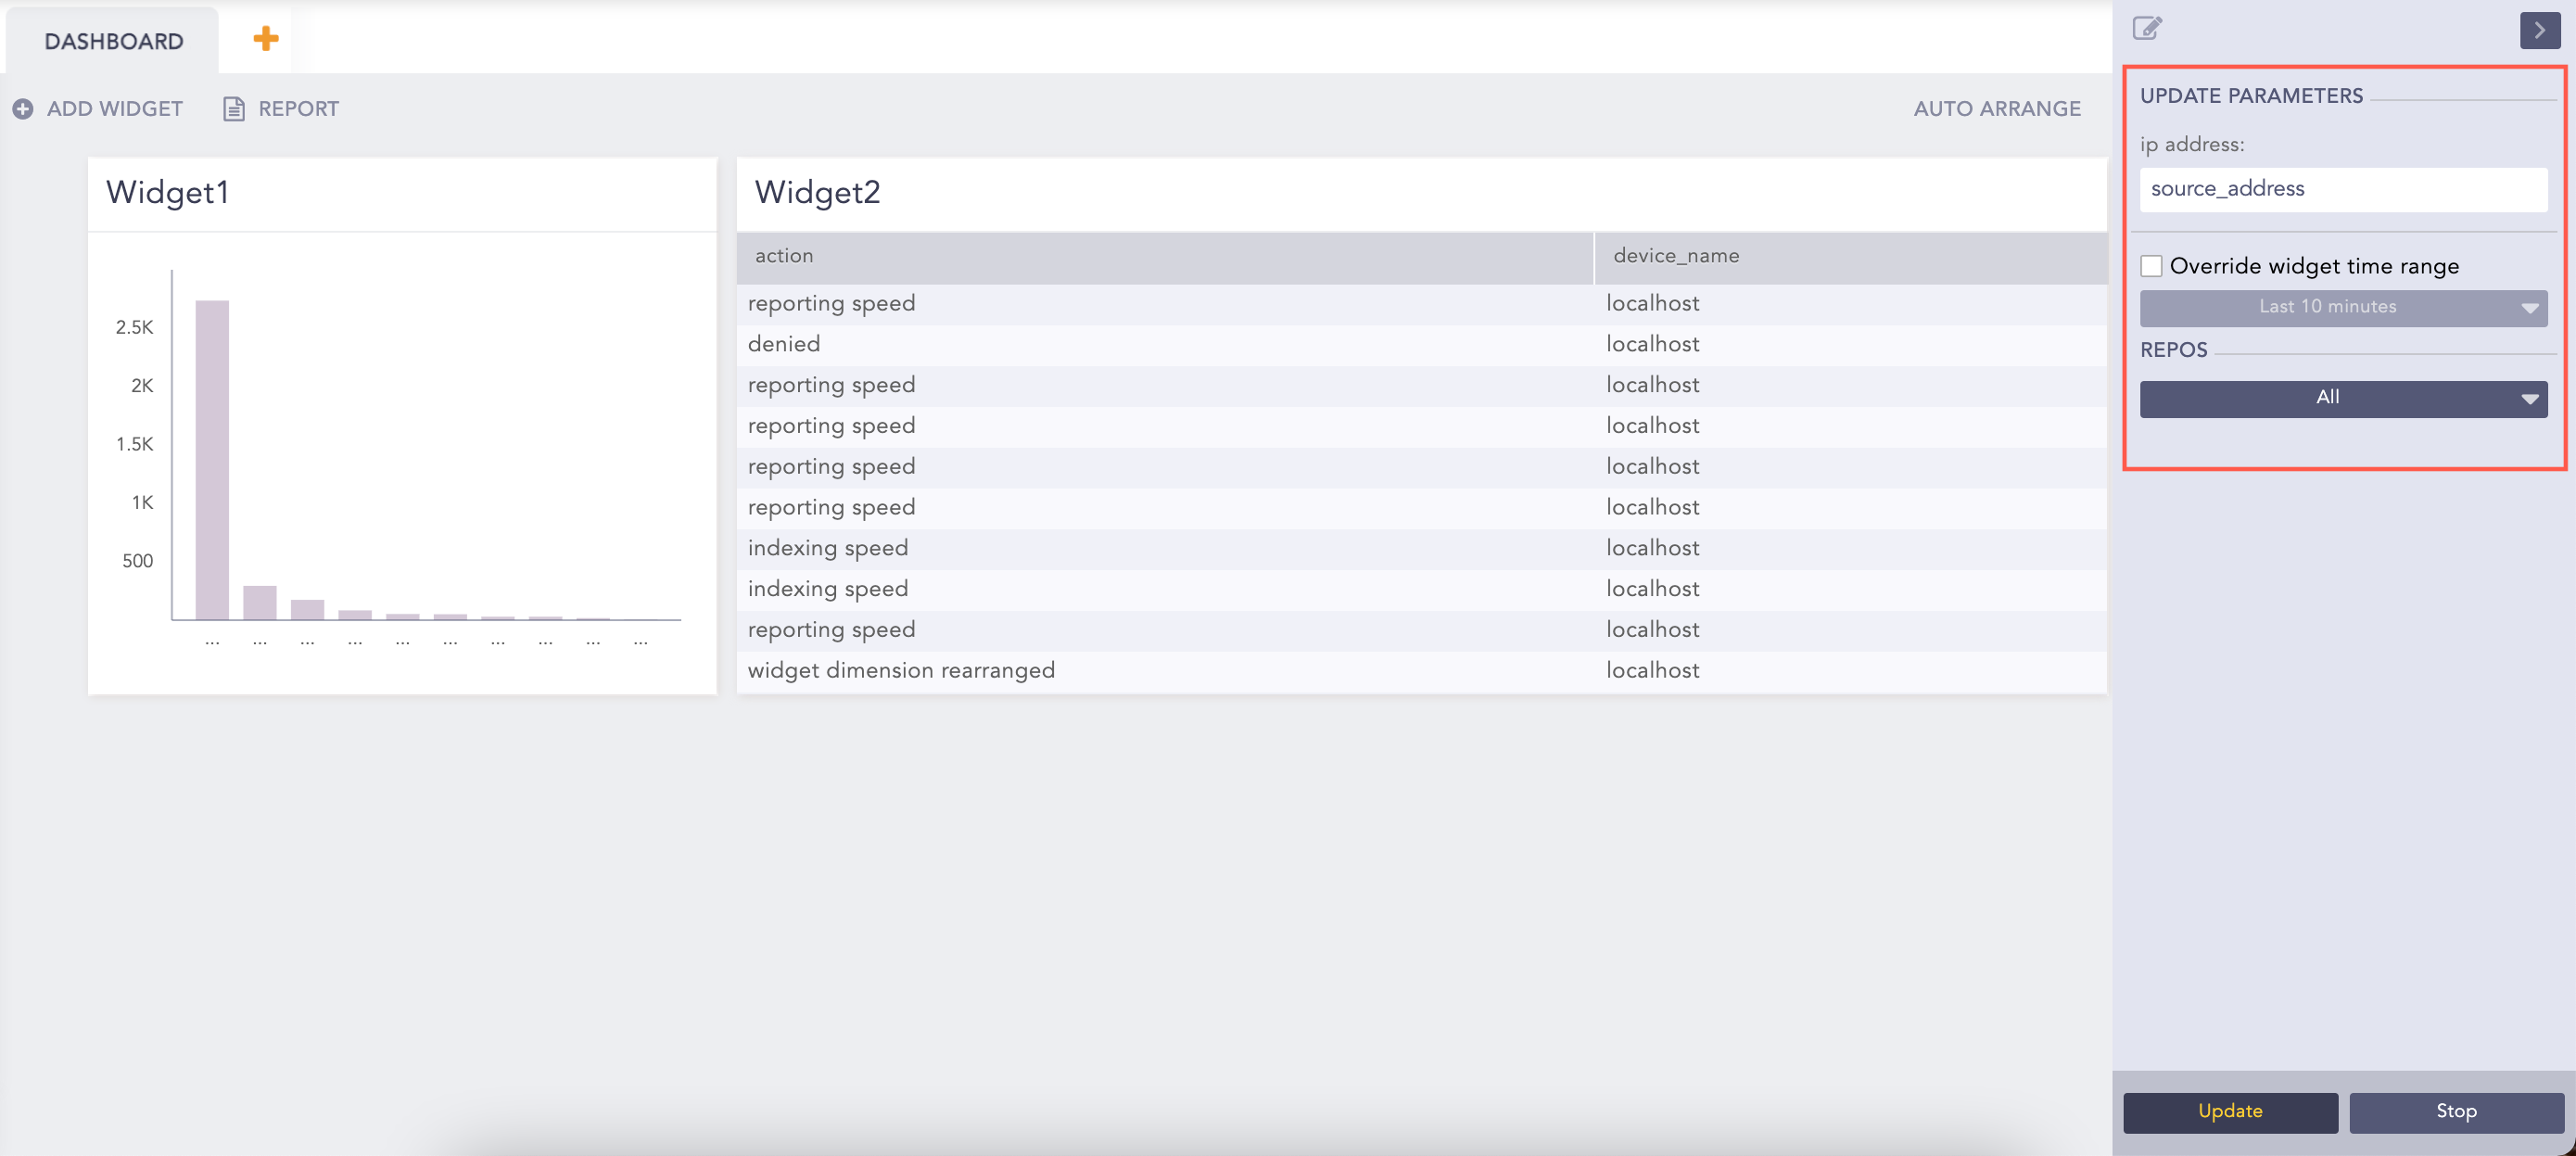
Update Parameters Panel
Click Override widget time range to select a time-range. The time-range you provide in this field takes precedence over the one provided for individual widgets.
Select the Repos in which to perform the search.
Click Update.
After clicking Update, the widgets continuously retrieve their respective logs. The widgets show updated values only after you click Update. Click Back to redirect to the list view of the search templates.
Click the Stop button to stop the widgets from retrieving additional logs. Doing this pauses the visualization of all the widgets. You can only see the already received log results.
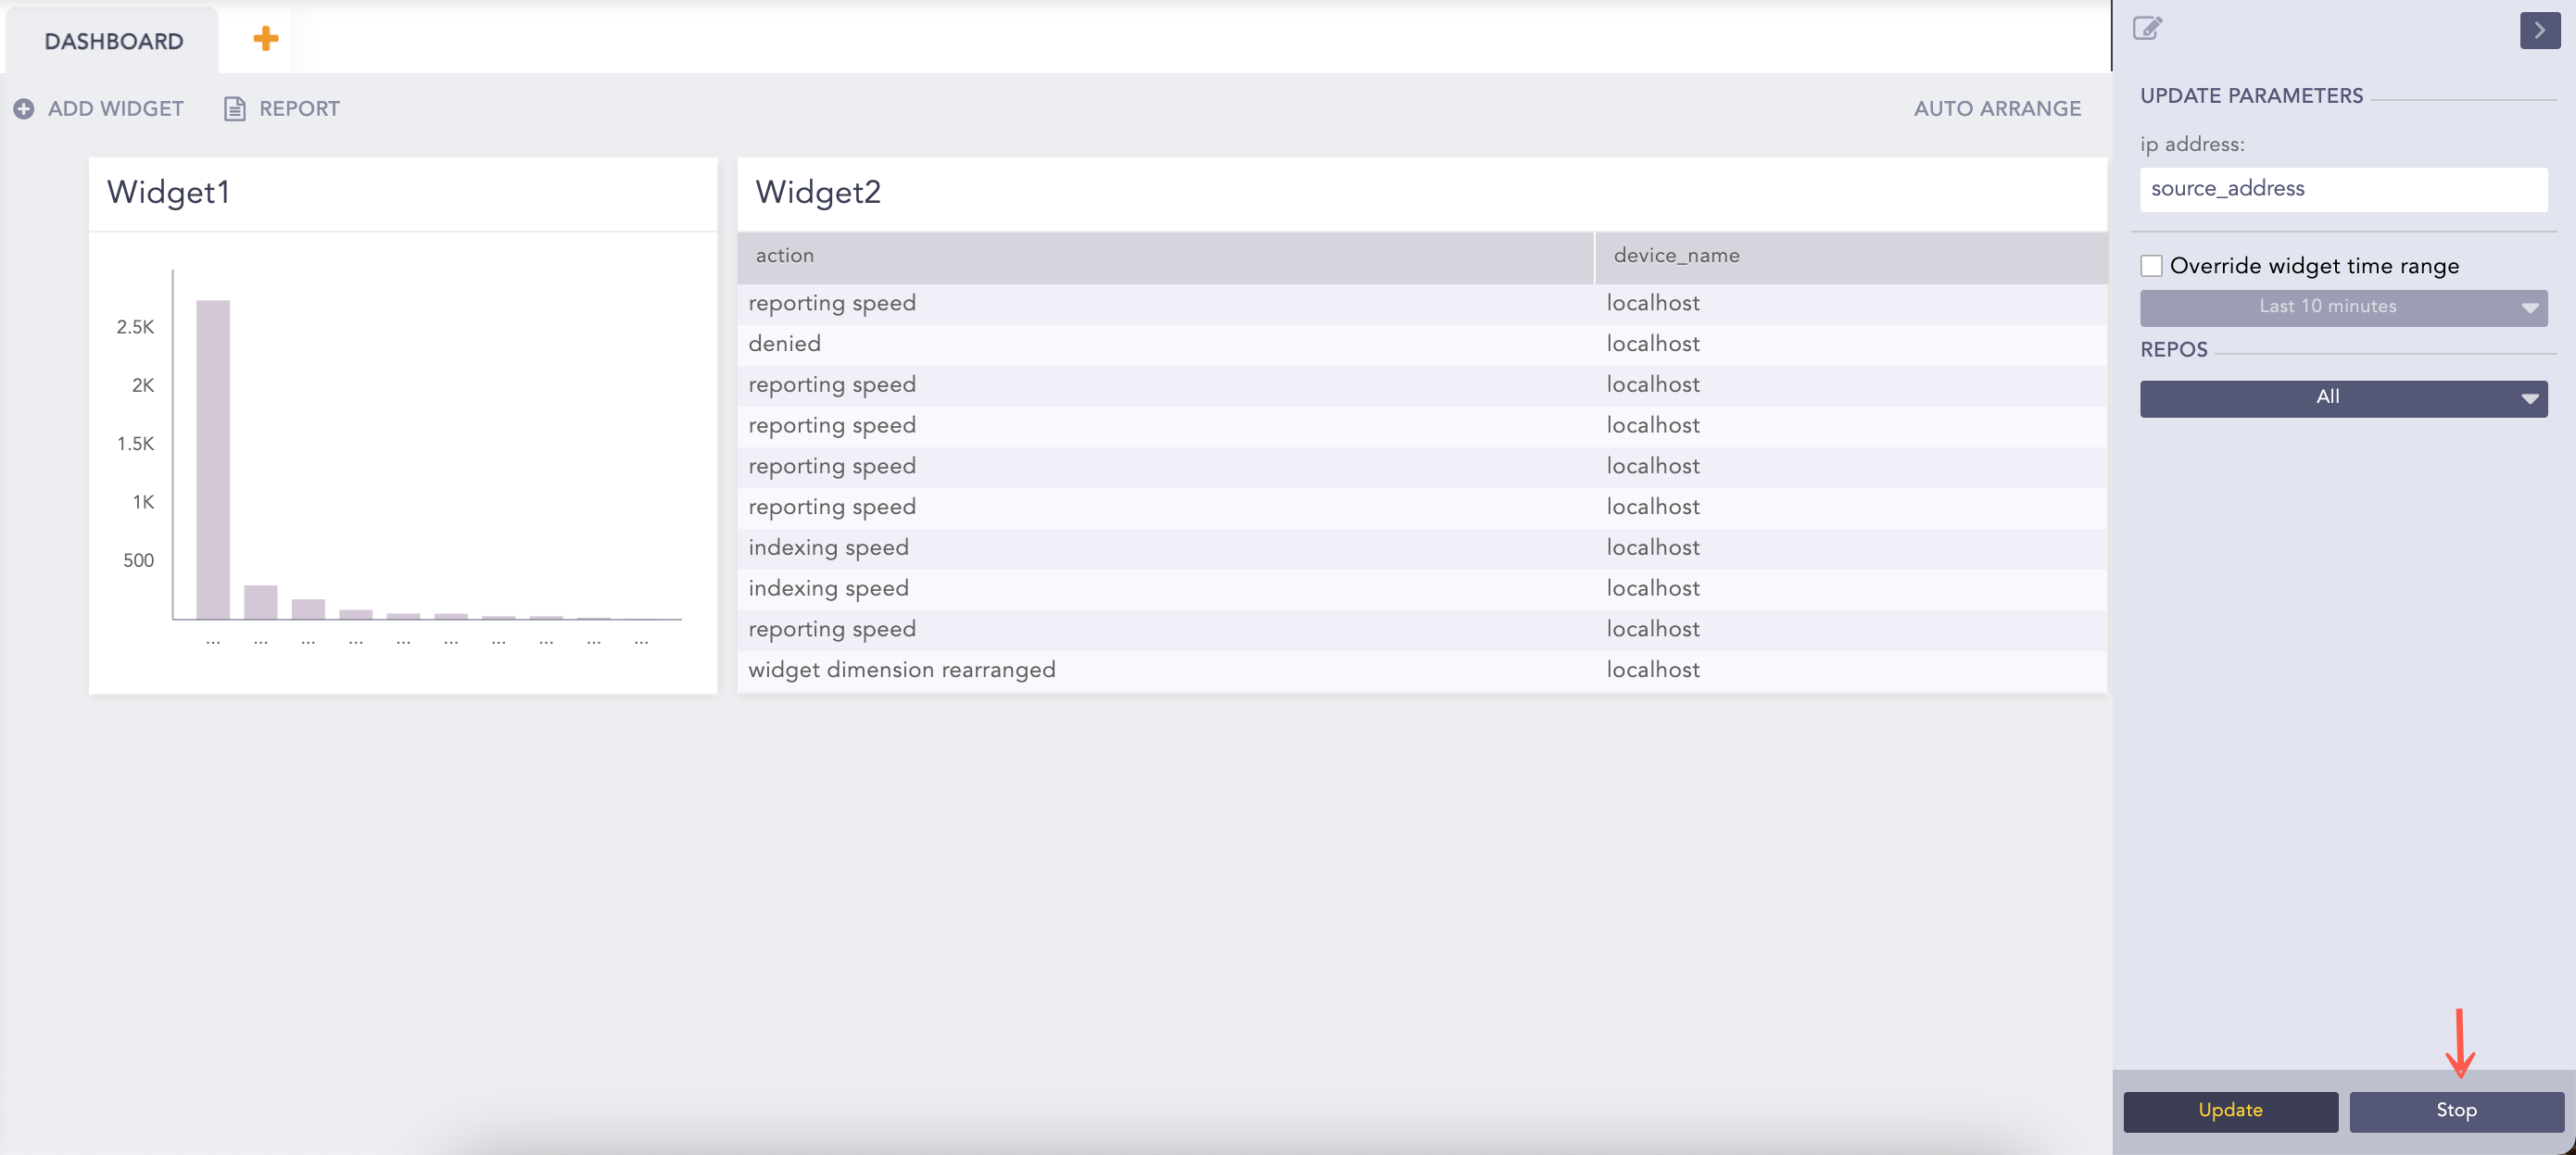
Stop Update